If you love mint and chocolate, you’ll adore these Mint Oreo Truffles! This no-bake treat is quick and easy, using just a few simple ingredients. Imagine creamy cream cheese mixed with crunchy Oreo bits and a hint of mint, all covered in rich dark chocolate. I’ll guide you through the steps to create these delightful bites that will impress anyone. Let’s dive in and make your new favorite dessert!
Why I Love This Recipe
- Decadent Flavor: The combination of rich chocolate and refreshing mint creates a delightful balance that is simply irresistible.
- Easy to Make: With just a few simple ingredients and minimal steps, these truffles are perfect for both beginners and experienced bakers.
- Perfect for Any Occasion: Whether it's a holiday gathering or a simple treat for yourself, these truffles are always a hit!
- Customizable: You can easily adjust the mint flavor or add your favorite toppings to make these truffles your own.
Ingredients
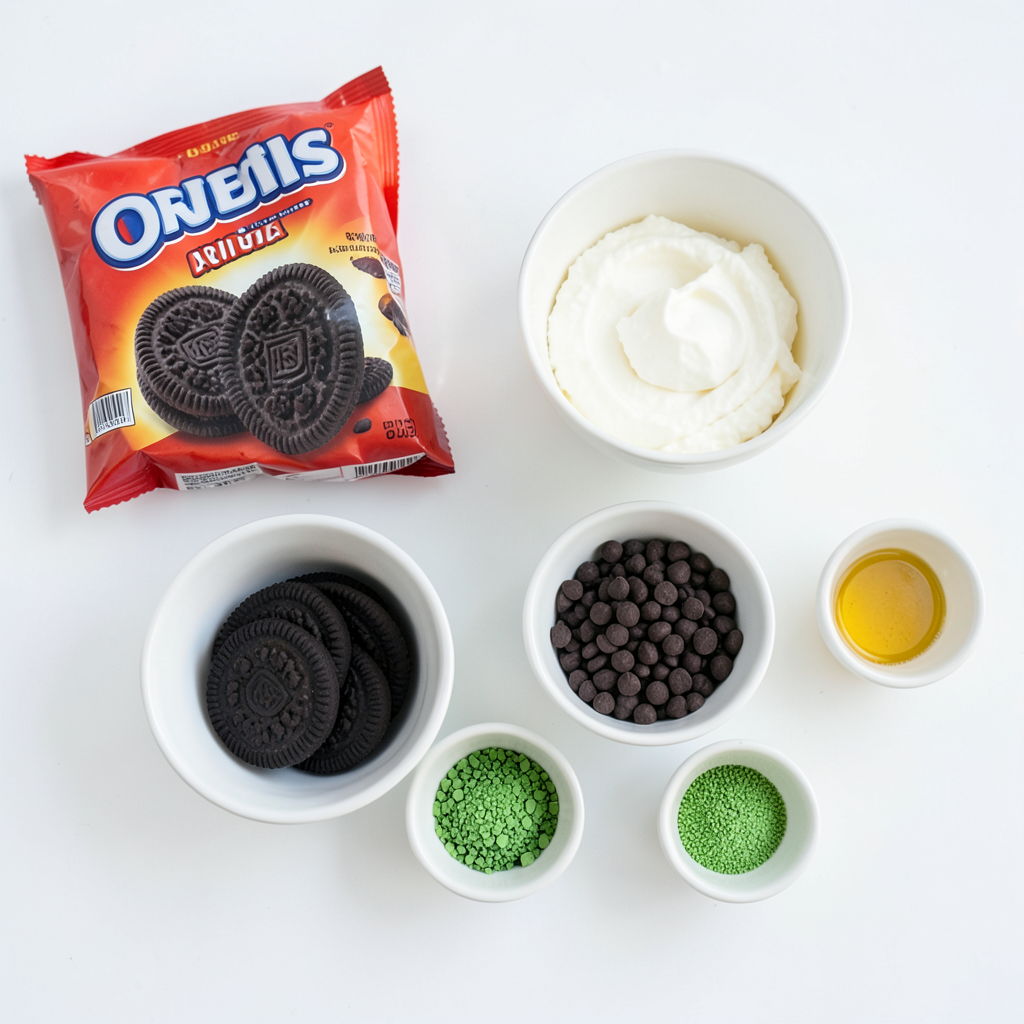
To make Mint Oreo Truffles, you need some simple ingredients. Here’s what you will need:
- 1 package (15.25 oz) Oreo cookies
- 8 oz cream cheese, softened to room temperature
- 1 teaspoon mint extract
- 2 cups dark chocolate chips
- 1 tablespoon coconut oil (for melting)
- Green sugar sprinkles (for garnish)
These ingredients combine to create a rich and minty treat. The Oreo cookies give a tasty crunch. Cream cheese adds a smooth texture. Mint extract brings a refreshing flavor. Dark chocolate chips coat the truffles, adding sweetness and depth. Coconut oil helps the chocolate melt smoothly. Finally, green sugar sprinkles make the truffles look festive and fun.
Using these ingredients, you can create a delightful no-bake dessert. The truffles are easy to make and perfect for sharing. They are a great treat for holidays or parties. You will impress your friends and family with this simple recipe!
Step-by-Step Instructions
Preparing the Oreo Mixture
1. Start with your Oreo cookies. Place them in a food processor.
2. Pulse the cookies until they turn into fine crumbs. You want no big pieces.
3. Take a mixing bowl and add the fine Oreo crumbs.
4. Add the softened cream cheese and mint extract to the bowl.
5. Use a spatula or your hands to mix everything together. It should feel thick and sticky.
Forming the Truffles
1. Take small portions of the mixture. Roll them into balls that are about 1 inch wide.
2. Arrange the rolled truffles on a baking sheet. Use parchment paper to stop sticking.
3. Place the baking sheet in the freezer. Chill the truffles for about 30 minutes. They should feel firm after this time.
Chocolate Coating Process
1. While the truffles chill, get ready to melt your chocolate.
2. In a microwave-safe bowl, mix dark chocolate chips with coconut oil.
3. Heat the mixture in 30-second bursts. Stir in between each burst. Keep going until it is smooth.
4. Once your truffles are firm, take them out of the freezer.
5. Using a fork, dip each truffle into the melted chocolate. Make sure they are well-coated.
6. Let any extra chocolate drip back into the bowl.
7. Place the chocolate-covered truffles back on the baking sheet.
8. While the chocolate is wet, sprinkle green sugar on top. This makes them look festive!
9. Return the truffles to the fridge. Let them chill for 15-20 minutes until the chocolate sets.
Tips & Tricks
Ensuring Perfectly Coated Truffles
To melt chocolate, use a microwave-safe bowl. Combine dark chocolate chips and coconut oil. Heat in 30-second bursts. Stir well between each burst. This keeps the chocolate smooth and prevents burning.
For dipping, use a fork to lift each truffle. Dip it into the melted chocolate. Make sure to coat it fully. Let the excess chocolate drip back into the bowl. This way, you’ll have a nice layer of chocolate.
Enhancing Flavor and Presentation
Quality matters. Use fresh, high-quality ingredients. Good chocolate makes a big difference. It helps your truffles taste rich and creamy.
For presentation, arrange the truffles on a bright platter. Use colorful cupcake liners for fun touches. Adding fresh mint leaves gives a pop of color. It also adds a fresh smell that guests will love.
Pro Tips
- Chill for Better Coating: Make sure to chill the truffles thoroughly before dipping them in chocolate. This helps them hold their shape and makes the coating process easier.
- Use Quality Chocolate: Opt for high-quality dark chocolate for the best flavor. The richer the chocolate, the more delicious your truffles will be!
- Experiment with Flavors: Feel free to swap the mint extract for other flavors like orange or raspberry. This way, you can create a variety of truffles to suit different tastes.
- Storage Tips: Store the truffles in an airtight container in the fridge. They can last up to a week, but they're so good, they probably won't last that long!
Variations
Alternative Flavor Options
You can change the flavors of Mint Oreo Truffles easily. Instead of mint extract, try using vanilla or almond extract. These options give a unique twist to the classic taste. You can also add a drop of peppermint oil for a stronger mint flavor. Just be careful not to add too much. A little goes a long way!
Decorating Ideas
Decorating your truffles makes them look fun and festive. Use colorful sprinkles, like rainbow or gold, to add flair. You can also drizzle melted white chocolate on top for a nice contrast. Simply melt some white chocolate chips and use a fork to create pretty lines over the chocolate-coated truffles. This extra touch makes them eye-catching and delicious!
Storage Info
How to Store Mint Oreo Truffles
To keep your Mint Oreo Truffles fresh, refrigeration is key. Place the truffles in an airtight container. This helps prevent them from drying out. Store the container in the fridge. They will stay fresh for up to a week.
If you want to store them longer, freezing works well too. Place the truffles in a single layer on a baking sheet. Freeze them for about an hour until firm. Then, transfer the truffles to an airtight container or freezer bag. They can last for up to three months in the freezer.
Shelf Life
Mint Oreo Truffles are best enjoyed fresh, but they can last a while. In the fridge, they stay good for about a week. In the freezer, they can last up to three months.
Keep an eye out for signs of spoilage. If the truffles develop an off smell or change in texture, it’s best to toss them. Any mold or discoloration is a clear sign they are no longer safe to eat. Enjoy your truffles while they are fresh for the best taste!
FAQs
Can I use gluten-free Oreos?
Yes, you can use gluten-free Oreos. They are a great option for those who are gluten-sensitive. Many stores now carry gluten-free Oreos. Look for them in the cookie aisle or online. This way, everyone can enjoy these tasty Mint Oreo Truffles!
How do I make truffles without cream cheese?
To make truffles without cream cheese, you can use nut butter. Almond or cashew butter works well. You can also try coconut cream for a dairy-free version. Mix it with the crushed Oreos and mint extract. This gives you a rich, creamy texture without the cream cheese.
Where can I buy pre-made Mint Oreo Truffles?
You can find pre-made Mint Oreo Truffles at local bakeries or specialty candy shops. Many grocery stores also carry them, especially during holidays. For online options, try sites like Amazon or specialty confectionery websites. Just be sure to check the reviews for quality!
You can create delicious Mint Oreo Truffles with simple ingredients and easy steps. Start by mixing crushed Oreos with cream cheese and mint. Form the mixture into balls, dip in chocolate, and add sprinkles for flair. Remember to use quality ingredients for the best taste. Store your truffles in the fridge for freshness. Whether for a party or a treat, these truffles are a fun dessert choice. Enjoy all the variations and share them with friends. Get ready to impress with this sweet treat!