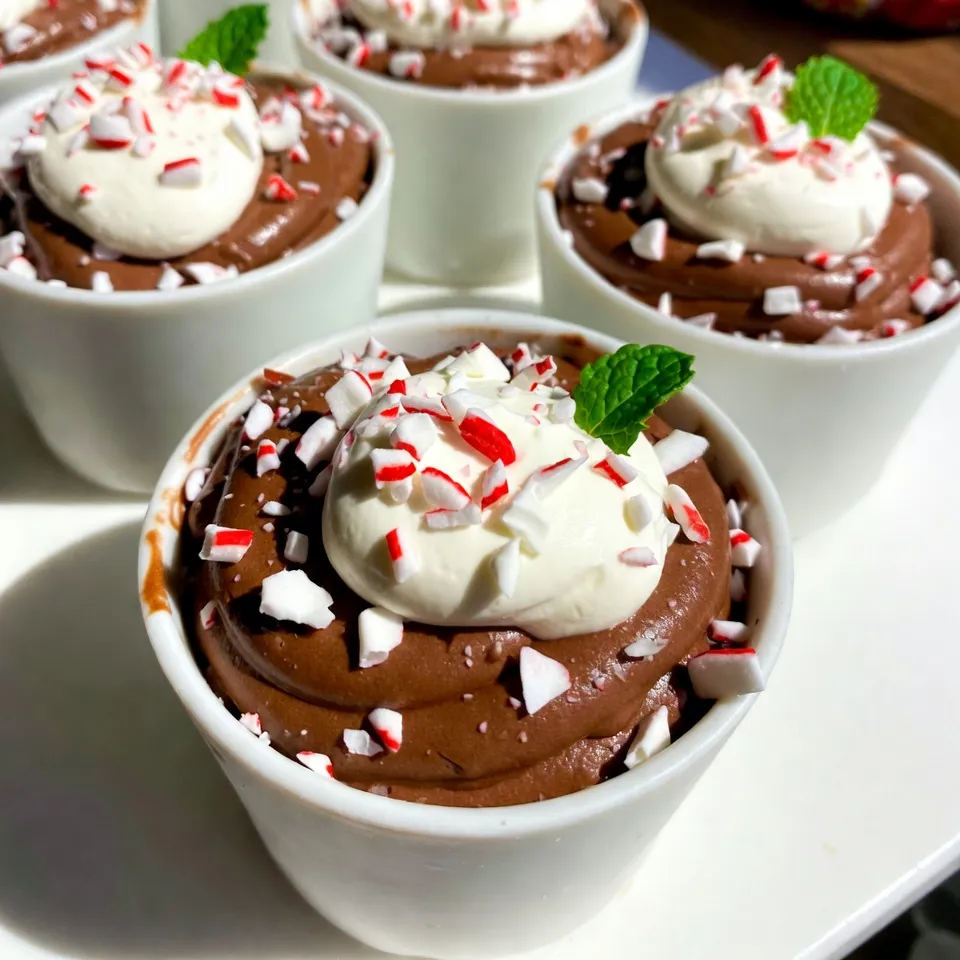
Looking for a sweet treat to impress your holiday guests? You’ve found it! These Christmas Chocolate Mousse Cups are easy to make and full of rich, festive flavors. In just a few simple steps, you can create a delightful dessert that will be the star of your holiday table. Let’s dive into the ingredients and get started on this irresistible holiday treat!
Why I Love This Recipe
- Decadent Flavor: The rich dark chocolate combined with the light, airy texture of the mousse creates a truly indulgent dessert experience.
- Festive Presentation: These mousse cups are not only delicious but also visually stunning, making them perfect for holiday gatherings and celebrations.
- Easy to Make: With simple ingredients and straightforward steps, this recipe is accessible for both novice and experienced bakers.
- Customizable Garnishes: The optional toppings allow for creativity; whether it’s whipped cream, peppermint, or fresh mint, you can tailor it to your taste.
Ingredients
List of Ingredients
To make the Christmas chocolate mousse cups, gather these simple ingredients:
– 1 cup heavy cream
– 6 ounces dark chocolate (70% cocoa), finely chopped
– 2 tablespoons granulated sugar
– 1 teaspoon vanilla extract
– 2 large egg whites
– 1/4 teaspoon salt
– 1/4 teaspoon cream of tartar
– Whipped cream for topping
– Fresh mint leaves for garnish
– Crushed peppermint candies for garnish
Seasonal Additions for Festive Flavor
You can add some seasonal flavors to make the mousse extra special. Consider mixing in:
– Ground cinnamon or nutmeg for warmth
– A splash of peppermint extract for a minty twist
– Orange zest for a bright, citrus note
These additions will enhance the holiday feel of your mousse cups.
Dietary Substitutions
If you want to make this recipe fit different diets, here are some options:
– For a dairy-free version, try coconut cream instead of heavy cream.
– Use dairy-free dark chocolate to keep it vegan.
– Swap out the egg whites for aquafaba (the liquid from canned chickpeas) for a vegan option.
These substitutions can help you cater to various dietary needs while still enjoying this festive treat.

Step-by-Step Instructions
Detailed Preparation Steps
To make Christmas chocolate mousse cups, follow these steps closely. First, prepare a double boiler. Fill a saucepan with a few inches of water and bring it to a gentle simmer. Use a heatproof bowl and place it over the saucepan. Make sure the bowl does not touch the water.
Next, add the finely chopped dark chocolate to the bowl. Stir continuously until it melts and becomes smooth. This should take about 5 minutes. Once melted, remove the bowl from heat and let it cool for about 10 minutes.
In a medium mixing bowl, combine 1 cup of heavy cream, 2 tablespoons of granulated sugar, and 1 teaspoon of vanilla extract. Use an electric mixer on medium-high speed to whip the mixture until soft peaks form. This should take around 3-4 minutes, so keep an eye on it.
Now, in another clean mixing bowl, whip 2 large egg whites with 1/4 teaspoon of salt and 1/4 teaspoon of cream of tartar. Beat until stiff peaks form, which will also take about 3-4 minutes.
Gently fold the cooled melted chocolate into the whipped cream using a rubber spatula. Mix just until combined, making sure there are no visible streaks of chocolate. Carefully fold in the whipped egg whites in three parts. This keeps the mousse light and airy, so be gentle.
Once mixed, spoon the chocolate mousse into serving cups or small jars. Place them in the fridge to chill for at least 2 hours until set.
Tips for Using a Double Boiler
Using a double boiler is simple but needs care. Always ensure the water in the saucepan does not touch the bowl. If the water boils too hard, it can splash into the chocolate and ruin it. Keep the heat low for a gentle melt. Stir the chocolate often to avoid burning. If you notice any lumps, take the bowl off the heat and stir until smooth.
How to Achieve Perfect Whipped Cream
To make perfect whipped cream, start with cold heavy cream. Cold cream whips better. Use an electric mixer and whip on medium-high speed. Watch for soft peaks, which should take about 3-4 minutes. Stop mixing as soon as soft peaks form. Overbeating can turn the cream grainy, so check often. For an extra touch, you can add a bit of powdered sugar to sweeten your whipped cream.
Tips & Tricks
Common Mistakes to Avoid
When making chocolate mousse, avoid overbeating the cream. Overbeaten cream can become grainy instead of smooth. Also, be careful when folding in the egg whites. If you mix too hard, you can deflate the mousse. Use a gentle touch for the best results. Lastly, make sure your chocolate cools before mixing it in. Hot chocolate can melt the cream and ruin the texture.
How to Achieve the Best Texture
To get a light and airy mousse, whip the egg whites until stiff peaks form. This adds volume and fluffiness. Fold the whipped cream and egg whites gently into the chocolate. Do this in three parts to keep the air in the mousse. Chilling the cups for at least two hours helps set the mousse, making it firm yet creamy.
Presentation Ideas for Holiday Gatherings
For a festive look, use pretty cups or jars for serving. Arrange them on a decorative platter for an eye-catching display. Top each cup with a generous dollop of whipped cream. Add a sprinkle of crushed peppermint candies for color. A fresh mint leaf on top adds a nice pop. You can also dust cocoa powder around the cups to enhance the holiday spirit.
Pro Tips
- Quality Chocolate Matters: Use high-quality dark chocolate for a richer and more intense flavor in your mousse.
- Egg Whites at Room Temperature: Allow your egg whites to come to room temperature before whipping for better volume and stability.
- Don’t Overbeat Cream: Stop whipping the heavy cream as soon as soft peaks form to ensure a smooth and creamy texture.
- Chill for Best Results: Allow the mousse to chill for the full 2 hours to achieve the perfect set and texture before serving.
Variations
Alternative Flavor Combinations
You can mix things up with different flavors. Try adding spices like ginger for a gingerbread twist. Use eggnog instead of vanilla for a holiday vibe. You can also add a hint of orange zest or espresso for a special touch. These options give your mousse a unique taste that fits the season.
Serving Suggestions
Pair your mousse cups with festive drinks like hot cocoa or spiced cider. They also go well with a slice of fruit tart or gingerbread cookies. For a fun touch, serve them in mini cups with chocolate shavings on top. These ideas make your dessert table fun and bright.
Adjustments for Different Serving Sizes
If you want to make more or fewer mousse cups, just adjust the recipe. For smaller servings, use smaller cups. You can also cut the ingredients in half for just two servings. If you want to impress a crowd, double the recipe for a party. Keep in mind, the chilling time stays the same, so plan your time well.
Storage Info
Best Practices for Storing Chocolate Mousse
To keep your chocolate mousse fresh, use airtight containers. Place each cup in the container to avoid spills. Make sure the mousse is fully chilled before sealing. This keeps the texture smooth and tasty.
How Long the Mousse Lasts
When stored properly, chocolate mousse lasts about 3 days in the fridge. It’s best to enjoy it within this time for the best flavor and texture. After that, it may start to lose its lightness.
Reheating and Serving Tips
You should not heat chocolate mousse. It is best served cold. If you want to make it look festive, add more toppings just before serving. A dollop of whipped cream and a sprinkle of crushed peppermint make it shine.
FAQs
Can I make Chocolate Mousse Cups ahead of time?
Yes, you can make Chocolate Mousse Cups ahead of time. I often prepare them a day in advance. This gives the mousse time to chill and set properly. Just cover them well and place them in the fridge. They stay fresh and tasty for up to two days. This way, you can enjoy your holiday without stress.
How do I know when the mousse is set?
You will know the mousse is set when it feels firm to the touch. After chilling for at least two hours, gently press the top with your finger. If it holds its shape, it is ready. You can also check by tilting the cup; the mousse should not move much. This ensures a light, airy texture when you take a bite.
What can I substitute for heavy cream?
If you need a substitute for heavy cream, you can use coconut cream. It gives a rich flavor and creamy texture. Another option is to blend silken tofu with a bit of milk until smooth. This works well for a lower-fat version. Both options will still give you a delicious mousse.
You now have all the tools to make a delicious chocolate mousse. We covered the key ingredients, step-by-step instructions, and tips to avoid common mistakes. You learned about variations, storage tips, and answers to FAQs.
With this knowledge, you can impress your friends and family. Enjoy experimenting with flavors and serving ideas. Make sure to share your tasty creations. Chocolate mousse can be a fun treat for any occasio