If you’re craving a quick and tasty meal, look no further than my cheesy chicken enchiladas. This simple dish combines shredded chicken, creamy cheese, and soft tortillas, all baked to perfection. I’ll guide you through easy steps to create a flavorful family favorite. Plus, I’ll share tips for making these enchiladas the star of your dinner table. Let’s get cooking and bring some cheesy goodness into your home!
Why I Love This Recipe
- Quick and Easy: This recipe utilizes rotisserie chicken, making it a breeze to prepare, even on busy weeknights.
- Cheesy Goodness: The combination of cream cheese and sharp cheddar creates a rich, creamy filling that’s irresistible.
- Customizable: You can easily modify the fillings by adding your favorite veggies or swapping in different proteins.
- Perfect for Sharing: This dish is great for gatherings, allowing everyone to enjoy a delicious meal together.
Ingredients
Main Ingredients
– 2 cups shredded cooked chicken
– 1 cup cream cheese, softened
– 1 cup shredded sharp cheddar cheese
– 8 small corn tortillas
– 1 cup green enchilada sauce
Additional Ingredients
– 1 cup canned black beans, rinsed
– 1 cup corn kernels
– 1 teaspoon garlic powder
– 1 teaspoon ground cumin
– 1/2 cup diced red onion
Garnishes
– Fresh cilantro leaves
– Sliced jalapeños (optional)
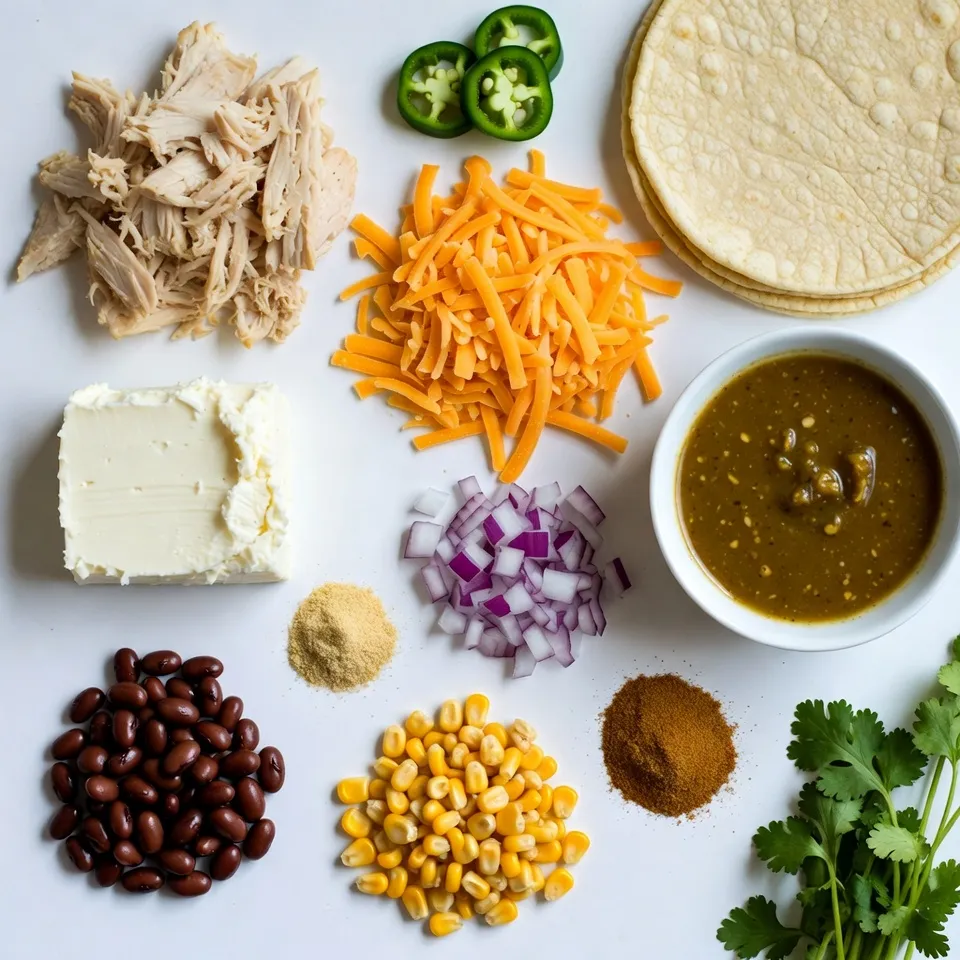
The main ingredients are the heart of the dish. I love using shredded cooked chicken from a rotisserie for quick prep. Cream cheese adds rich creaminess, while sharp cheddar gives a nice bite. The tortillas hold everything together, and the enchilada sauce ties it all up with flavor.
Next, I add black beans and corn for extra texture and taste. Garlic powder and cumin bring warmth and depth. Finally, the diced red onion adds a little crunch.
For garnishes, fresh cilantro brightens the dish. If you like spice, sliced jalapeños make a great topping. These ingredients work together to create a cheesy, flavorful meal everyone will enjoy.
Step-by-Step Instructions
Preparing the Mixture
First, grab a large bowl. Combine the shredded chicken, cream cheese, and cheddar cheese. Mix in the garlic powder and cumin for flavor. Then add the black beans and corn. Stir well until everything blends together nicely. You want a creamy, tasty filling for your enchiladas.
Preparing the Tortillas
Next, warm the tortillas. Use a dry skillet over medium heat for about 30 seconds on each side. This makes them soft and easy to roll. Take one warm tortilla and spoon some of your chicken mixture into the center. Roll it tightly and place it seam-side down in a greased baking dish. Do this for all tortillas.
Baking the Enchiladas
Once all tortillas are filled, pour the remaining green enchilada sauce over them. Sprinkle any leftover cheese and diced red onion on top. Cover the baking dish with aluminum foil to keep moisture in. Bake in the oven at 375°F (190°C) for 20 minutes. After that, remove the foil and bake for another 10-15 minutes. Look for melted cheese that is bubbly and golden brown. Let them cool for a few minutes before serving. Enjoy the cheesy goodness!
Tips & Tricks
Ensuring Perfect Enchiladas
To avoid tearing your tortillas, warm them first. Heat them in a dry skillet for about 30 seconds on each side. This makes the tortillas soft and easy to roll. If they are warm, they bend without breaking.
For even baking and melting cheese, cover your dish with foil for the first part of baking. This keeps moisture in and helps the cheese melt nicely. Remove the foil in the last 10 to 15 minutes. This allows the cheese to get golden and bubbly.
Serving Suggestions
To enhance flavor, serve your cheesy chicken enchiladas with fresh sides. A dollop of sour cream or guacamole adds creaminess. You can also try serving with a side of Mexican rice or a fresh salad.
For presentation, use a bright platter to showcase your enchiladas. Garnish with extra cilantro and a lime wedge on the side. This not only looks nice but adds a zesty kick.
Making Ahead
You can prep these enchiladas in advance. Fill and roll the tortillas, then place them in the baking dish. Cover and store them in the fridge for up to a day before baking.
When ready to bake, just add extra time to the cooking. If they are cold, they will need a few more minutes in the oven. To reheat leftovers, use the oven for the best texture. Bake them at 350°F (175°C) until heated through. This keeps them moist and cheesy.
Pro Tips
- Warm the Tortillas: Warming the corn tortillas before filling makes them more pliable and helps prevent them from tearing during the rolling process.
- Customize Your Fillings: Feel free to add other ingredients like diced bell peppers, spinach, or different types of cheese for a personalized twist on the classic recipe.
- Make Ahead: Assemble the enchiladas a day in advance and refrigerate them. When ready to bake, just pour the sauce and cheese on top and bake as directed.
- Garnish Creatively: Add toppings like avocado slices, sour cream, or pico de gallo for extra flavor and a beautiful presentation.
Variations
Chicken Alternatives
You can switch up the protein in these enchiladas. If you don’t have chicken, try shredded beef or turkey. These meats add a different taste while keeping the dish hearty. For a vegetarian twist, use sautéed mushrooms or jackfruit. Both options give a meaty feel.
Sauce and Cheese Variations
You can change the sauce from green to red. Red sauce brings a rich, bold taste. If you want a creamier dish, try using white sauce. As for cheese, feel free to mix it up! Use pepper jack for a spicy kick or mozzarella for a gooey texture.
Additional Ingredients
Add veggies to boost flavor and nutrition. Bell peppers, spinach, or zucchini work great. You can also sprinkle in spices like chili powder or smoked paprika. For a fun twist, add quinoa or lentils instead of rice. These changes create exciting new flavors while keeping it simple.
Storage Info
Refrigeration Tips
To store your cheesy chicken enchiladas, let them cool first. Place the leftovers in an airtight container. You can keep them in the fridge for up to four days. This keeps them fresh and tasty.
Freezing Instructions
If you want to freeze enchiladas, wrap them tightly in plastic wrap. Then, place them in a freezer-safe bag. They can last for up to three months in the freezer. When you’re ready to eat, thaw them in the fridge overnight.
Reheating Tips
To reheat, use an oven for the best results. Set the oven to 350°F (175°C). Cover the enchiladas with foil to keep them moist. Bake for about 20 minutes. This helps avoid dry enchiladas. If you prefer the microwave, heat them in short bursts. Add a splash of water to keep them from drying out.
FAQs
What can I use instead of cream cheese?
You can use several alternatives for creaminess. Here are some options:
– Greek yogurt
– Sour cream
– Silken tofu
– Cashew cream
These choices still provide that rich texture. Each option offers a unique flavor. For example, Greek yogurt adds a slight tang, while cashew cream brings a nutty depth.
Can I make these vegetarian?
Yes, you can easily make these enchiladas vegetarian. Try these substitutions:
– Replace chicken with cooked lentils or black beans.
– Use additional veggies like bell peppers or zucchini.
– Swap cream cheese with tofu or vegan cream cheese.
These changes keep the dish hearty and flavorful without meat.
How long does it take to bake the enchiladas?
Baking the enchiladas typically takes about 30 to 35 minutes. Preheat your oven to 375°F (190°C). Cover the dish with foil for the first 20 minutes. Then, uncover it to let the cheese get bubbly and golden.
Can I prepare these enchiladas ahead of time?
Yes, you can prepare these enchiladas in advance. Here’s how:
– Assemble the enchiladas and place them in the baking dish.
– Cover tightly and store in the fridge for up to 24 hours.
– When ready, bake as usual, adding a few extra minutes if cold.
This method saves time and makes meal prep easy!
In this blog post, we explored making delicious enchiladas with simple steps. You learned about the main ingredients and how to prepare them. We shared tips for perfecting your dish and suggested fun variations. Remember, you can customize your enchiladas to fit your taste. Store leftovers well to keep them fresh. Enjoy your cooking and the flavors that come with i